Delayed ordering allows POS operators to create an order for a chosen pickup time, up to 24 hours in advance, with additional details and configuration rules applied as needed.
Delayed Ordering Topics
Delayed Ordering Setup
Follow these steps to setup delayed ordering:
-
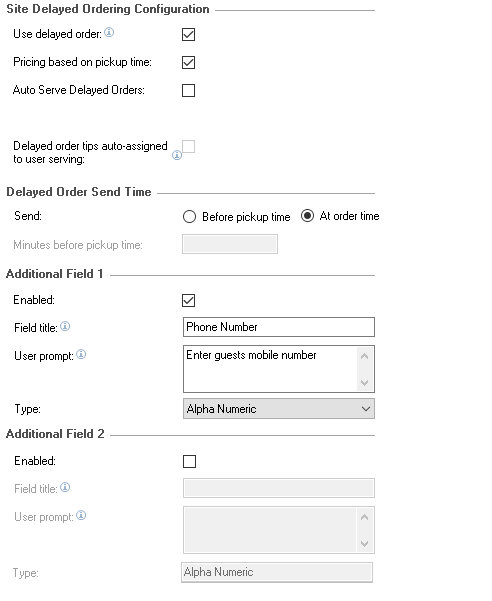
Select Use Delayed Order
By default delayed ordering is not enabled -
Select the following options
-
Pricing Based on Pickup Time - orders added with this setting enabled will use any pricing or promotions applicable at the time of pickup, this will continue until the delayed order is served even if promotions have finished
The only caveat to this if a delayed order is assigned to a table any promotions will not longer trigger -
Auto Serve Delayed Orders - when enabled POS operators will be prompted when performing a 'Session Change' to serve delayed orders
-
Delayed Order Tips Auto-Assigned to User Serving - if an order has come in from an external source and the guest has left a tip this will be recorded against the 'ordering operator', this setting will enable the tip to be transferred to the POS operator serving the order
To enable this setting requires 'Auto Payout Tips' to be enabled and 'On Clock Out' to be unselected in Theme Modelling → Site Setup → Miscellaneous
-
-
Set the required Delayed Order Send Time
-
At Order Time - order will be sent to dispense printers / kitchen systems at the time the order was placed
-
Before Pickup Time - order will be sent at the defined number of minutes before pickup time
-
Enter the required minutes before pickup time
-
-
-
Optionally select to enable Additional Field 1 and 2 with the following options
When enabled the POS operator or guest (when ordering through click and collect) will be prompted to enter additional information-
Field Title - main name / description of the information required
This information will be show on the point of sale order display and printed bills and receipts -
User Prompt - information shown to the POS operator when the prompt is shown
-
Type - defines the available inputs that can be used on the point of sale
-
Alpha Numeric
-
Alpha Numeric Plus Pronunciation
-
Numeric
-
-
-
Click Save
Theme Settings
Follow these settings to add delayed ordering function buttons:
-
Open the required Shared or Local Panel
-
From the Button Picker navigate to Other Lists | Delayed Orders
-
Drag the following buttons on to the panel
-
Start Delayed Order
-
Serve Delayed Order
-
Delayed Order Time (optional)
-
Hold Delayed Order (optional)
-
Serve All Delayed Orders (optional)
Adjust the properties of the buttons as required, Size | Colour | Position | Security
For more detailed information on managing button properties click here -
-
Click Save